Hi John
I too am plagued by angled cuts and yours is the second time I have read a post recommending raising the tube height. My questions are: By how much and how do you ascertain the right amount? and how do you actually do it?presumably some packing of some kind.
Any help appreciated
Regards
Rob
not cutting very deep
-
robburge@sky.com
- Posts: 48
- Joined: Sat Oct 16, 2010 4:10 pm
- Contact:
Re: not cutting very deep
Hey guys,
Cuts will always have a taper from top to bottom, it's not possible to get rid of it totally as the lens system is a single one, To get a dead straight cut through you either need a water assisted laser or a twin divergence set up (very expensive on both counts)
Best way round I have found is by using a 63.5mm focal length lens, it's a bit like using a sharper knife to cut with. (assuming the smaller machines have enough Z movement to use them)
best wishes
Dave
ps: Don't always believe the calibration slip, the focal length is advisory at 50.8mm, 0.5 up or down isn't uncommon (Unless you use RMI lens's at 200 quid a pop)
Please note I am not employed by HPC, any advice or recomendations I give are based on my own experience and are not necessarily the same as HPC's. First point of contact on any hardware issues should be with HPC
Dave@OpticalPower.co.uk
Dave@OpticalPower.co.uk
-
Bernie_of_CPE
- Posts: 27
- Joined: Sun Sep 13, 2009 10:25 pm
- Contact:
Re: not cutting very deep
As a guide, if you can't cut 6 mm acrylic like this there is an alignment problem.
It has taken me a good while to work out how to set up this machine and get the best out of it. I will write up a set of guides so you can improve and gain the performance these machines are really capable of.
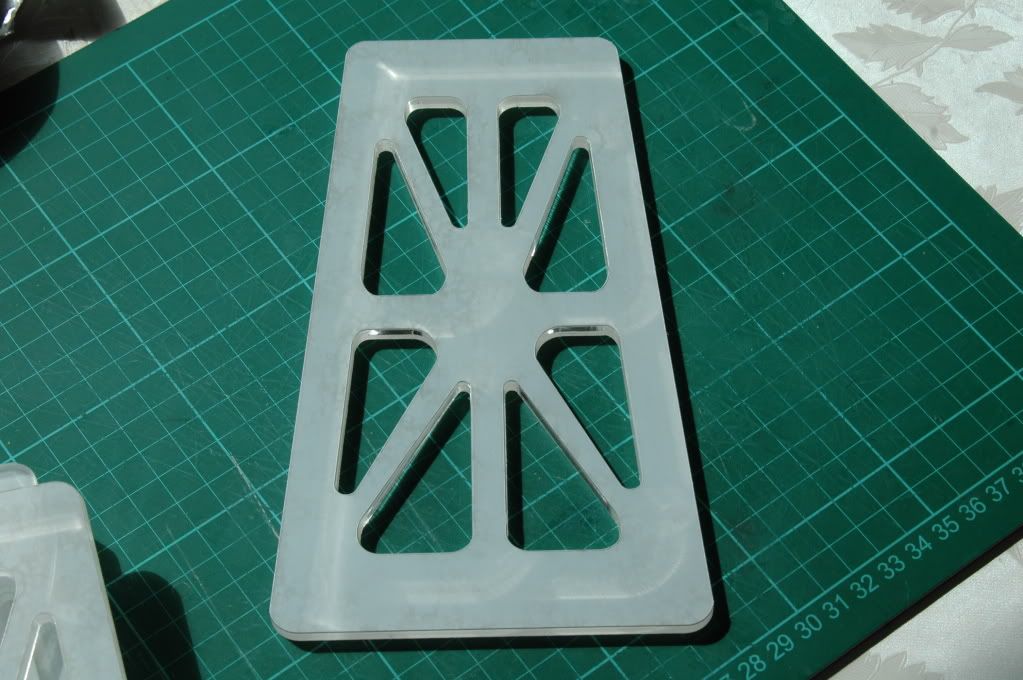
Cut on my LS6090 60watt 75% power, speed 15, material is clear cast 6 mm acrylic with the protective sheets left on. The cut is perfectly smooth, vertical and perfect both above and below edges. The parts drop out when the sheet is lifted and there is no evidence of crazing anywhere. Cutting thinner materials can be done on lower power settings and at much faster speeds. I don't use a water chilling unit and have never changed from the original configuration that came with the machine. I spend 5 minutes before every working day checking alignment, water flow, removing any off cuts and preparing the machine to work.
It wasn't always like this believe me, but if you take the time to ensure you have a decent set up you will be amazed at the result.
It has taken me a good while to work out how to set up this machine and get the best out of it. I will write up a set of guides so you can improve and gain the performance these machines are really capable of.
Cut on my LS6090 60watt 75% power, speed 15, material is clear cast 6 mm acrylic with the protective sheets left on. The cut is perfectly smooth, vertical and perfect both above and below edges. The parts drop out when the sheet is lifted and there is no evidence of crazing anywhere. Cutting thinner materials can be done on lower power settings and at much faster speeds. I don't use a water chilling unit and have never changed from the original configuration that came with the machine. I spend 5 minutes before every working day checking alignment, water flow, removing any off cuts and preparing the machine to work.
It wasn't always like this believe me, but if you take the time to ensure you have a decent set up you will be amazed at the result.
Best regards.
Bernie_of_CPE (Custom Product Engineering)
Bernie_of_CPE (Custom Product Engineering)
Re: not cutting very deep
Like Bernie, it took me some time to be able to cut acrylic well but once the techniques had been mastered the results have been just great. I constructed my own honeycomb (sort of) bed and use a sheet of glass in the base to avoid reflections from the table spoiling the reverse side of the work. I always cut slow and with the minimal amount of air assist (just enough to protect the lens) and I do not get any edge crazing or flare-ups but I never leave the machine unattended when cutting acrylic, just in case. I have found that if I leave the protective covering on I get a slightly raised edge which is acceptable in most cases but not always.
Acrylic is one of the group of materials which will sublimate (turn from a solid to a gas without going through the liquid stage) and providing you get the power and cutting speed just right there is never any molten material to block the kerf or spoil the polished edges. In addition, clear acrylic acts as a wave-guide to the infra-red laser beam which will allow much straighter edges to be achieved than with most other materials. This "hole" is about 17mm deep and was produced by a 3 second burst at 75% power - although it tapers away a bit at the bottom it indicates that a parallel cut over a distance of some 10mm is easily achievable with my 50mm focal length lens.
Hope this helps a bit.
Tweakie.
- Attachments
-
- DSC00794aa.jpg
- (31.36 KiB) Downloaded 714 times
Re: not cutting very deep
Am I missing something here? I cut 10mm white acrylic yesterday approx 25% power and speed 10 - I'm sure the first pass nearly did it but let it continue the second pass anyway. In fact I turned the power down on the second pass!
The sides of the cut are nice and smooth - top to bottom there is a small taper as you would expect. So I'm wondering if I was lucky with my machine or my expectations of quality are not as high as yours? Has me a bit worried if the work I have done recently is not up to scratch.
Cheers
Dave
The sides of the cut are nice and smooth - top to bottom there is a small taper as you would expect. So I'm wondering if I was lucky with my machine or my expectations of quality are not as high as yours? Has me a bit worried if the work I have done recently is not up to scratch.
Cheers
Dave
Using two LS3060's and an ex 3020 user
Please note I am not employed by HPC, any advice or recomendations I give are based on my own experience and are not necessarily the same as HPC's. First point of contact on any hardware issues should be with HPC
Please note I am not employed by HPC, any advice or recomendations I give are based on my own experience and are not necessarily the same as HPC's. First point of contact on any hardware issues should be with HPC
Re: not cutting very deep
A 40watt tube @ 25% power and 10mm per second is awesome Dave on that material. My 80watt won't do that at 75% power and 10 speed.
best wishes
Dave
best wishes
Dave
Please note I am not employed by HPC, any advice or recomendations I give are based on my own experience and are not necessarily the same as HPC's. First point of contact on any hardware issues should be with HPC
Dave@OpticalPower.co.uk
Dave@OpticalPower.co.uk
-
Bernie_of_CPE
- Posts: 27
- Joined: Sun Sep 13, 2009 10:25 pm
- Contact:
Re: not cutting very deep
The very last thing to consider is what you are cutting.
Use cast material if you have a choice. It is very stable, has a lower hydroscopic character (IMHO) and present you the easiest set of challanges. In other words give yourself the best chance.
When setting up the mirror alignment clean as you go, heated dust will produce burnt ash that can settle anywhere, buy a blower brush like the camera guys use, a light dusting everyday will keep the power up.
If you are making good cut depth with little power then you don't have any worries. The huge advantage of a forum like this is to see how others do things and set up some bench marks for yourself. One of the first signs of a problem is having to keep turning up the power and / or lower the speed. Every time I show a job I will always state my machine & settings to guide others and set the bench mark. I am making a test rig with a visible laser to help me with mirror alignment as it's nice to use a red dot laser pointer and make adjustments "live". As soon as I have firmed up the design I will publish a build your own version here.
Here are a few images to illustrate as it's easier to show than tell. It takes a moment to check alignment, first cut some test pieces from clear acrylic you will need a square 41 mm across if you have the same lens stack as my machine (LS6090) obviously modify the idea to suit. Luckily on my machine there is a lip right before the last mirror.

Place the square flush against the mirror aperture, my machine is totally level so it luckily it balances there - never ever under ANY circumstances hold it there, use a little masking tape if needed. Fire the laser via the keypad once and it will fog a witness mark on the square where it enters the lens stack:
Turn the machine off and before moving it take a look where it lies in relation to the hole, you are looking for a circular shape perhaps 5 - 6 mm across and in an ideal world it would lie directly over the center of the hole. If not replace it and adjust the second mirror via the brass screws behind the mirror assembly, make small adjustments turning just one screw a little and firing the laser again, note which way the beam has moved, adjust and test again, remember small movements perhaps only a 5 degree turn of the brass screw in one operation
Once you are happy it is in in as central a position as you can make it, drop the test piece onto the table under the lens, focus in the usual way and fire manually enough to produce a hole (1 sec or less on my 60 watt tube with 3 mm material). It should leave a hole perfectly circular and uniform on both sides if you can measure it's diameter it would be 0.1 mm wide. You can see that here:
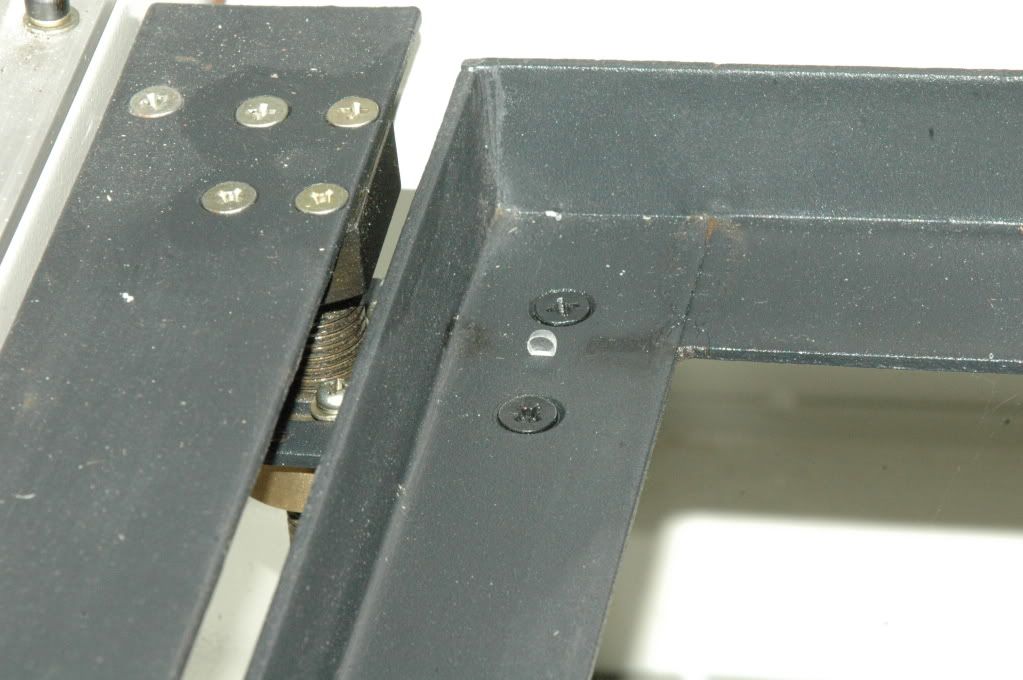
Don't forget to check the usual suspects for undesired results, look at this situation where a tiny off cut from a 1 mm hole core had found it's way under the table at one end inclining it by 2 mm across it's long side. Not always obvious but will generate a loss of focus from one end to the other. Keep a brush handy is the morale.
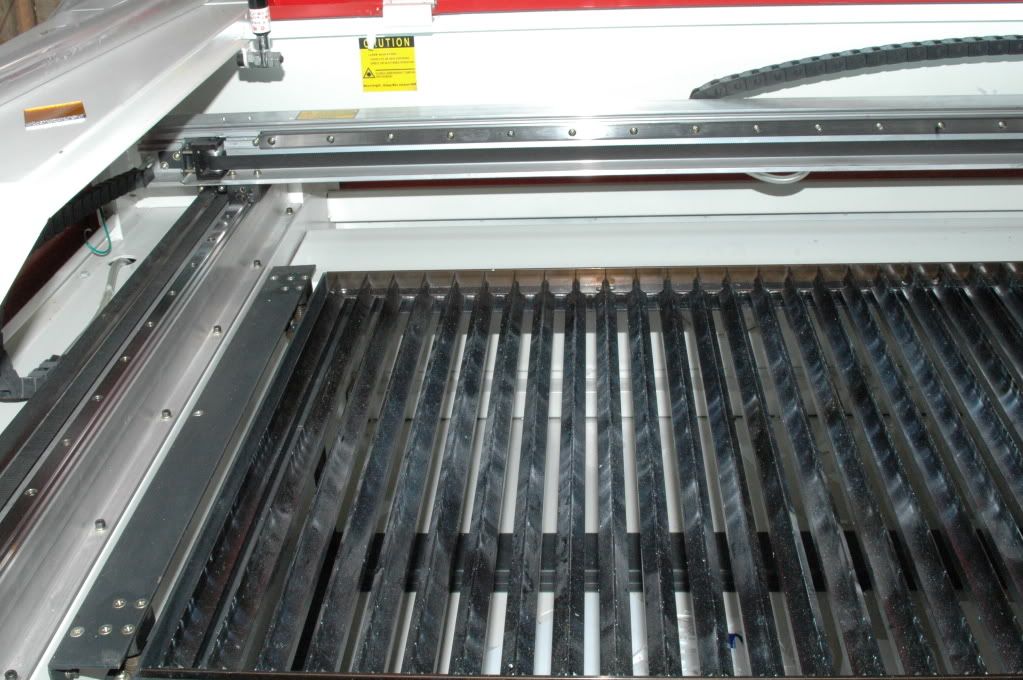
It's about time this table was cleaned, we had to cut smelly styrene and it leaves a sticky oily residue which will stick to the face of nice clean acrylic. Charlotte gave me a great tip to use oven cleaner like Mr Muscle (UK) it's basically a strong grease cutting detergent, but alloy wheel cleaner works just as well, remember rinse thoroughly .
Use cast material if you have a choice. It is very stable, has a lower hydroscopic character (IMHO) and present you the easiest set of challanges. In other words give yourself the best chance.
When setting up the mirror alignment clean as you go, heated dust will produce burnt ash that can settle anywhere, buy a blower brush like the camera guys use, a light dusting everyday will keep the power up.
If you are making good cut depth with little power then you don't have any worries. The huge advantage of a forum like this is to see how others do things and set up some bench marks for yourself. One of the first signs of a problem is having to keep turning up the power and / or lower the speed. Every time I show a job I will always state my machine & settings to guide others and set the bench mark. I am making a test rig with a visible laser to help me with mirror alignment as it's nice to use a red dot laser pointer and make adjustments "live". As soon as I have firmed up the design I will publish a build your own version here.
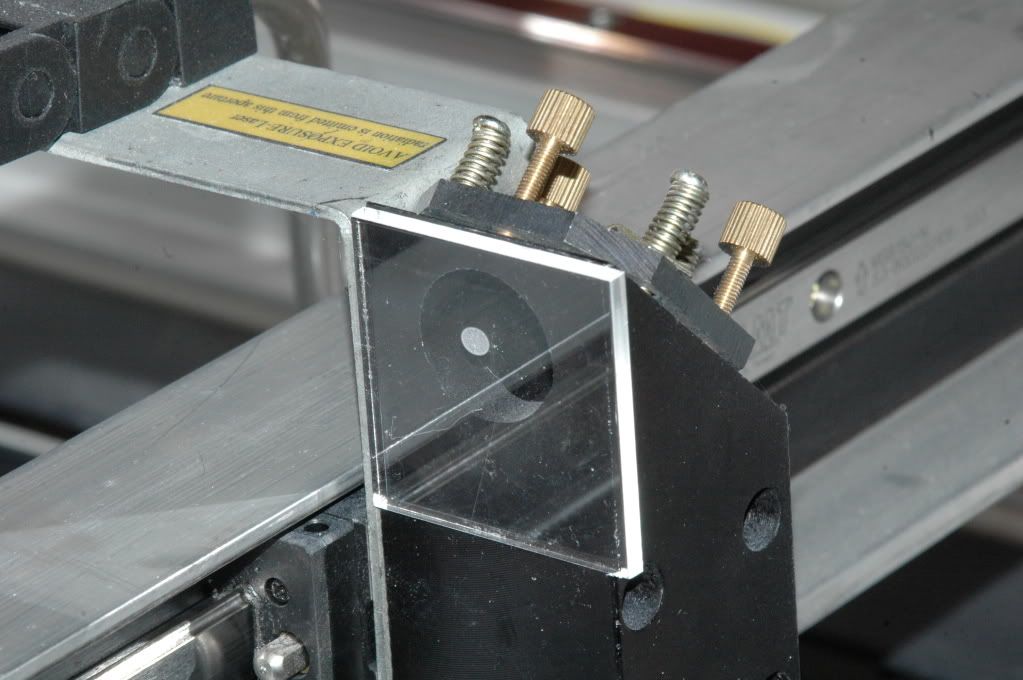
Here are a few images to illustrate as it's easier to show than tell. It takes a moment to check alignment, first cut some test pieces from clear acrylic you will need a square 41 mm across if you have the same lens stack as my machine (LS6090) obviously modify the idea to suit. Luckily on my machine there is a lip right before the last mirror.
Place the square flush against the mirror aperture, my machine is totally level so it luckily it balances there - never ever under ANY circumstances hold it there, use a little masking tape if needed. Fire the laser via the keypad once and it will fog a witness mark on the square where it enters the lens stack:
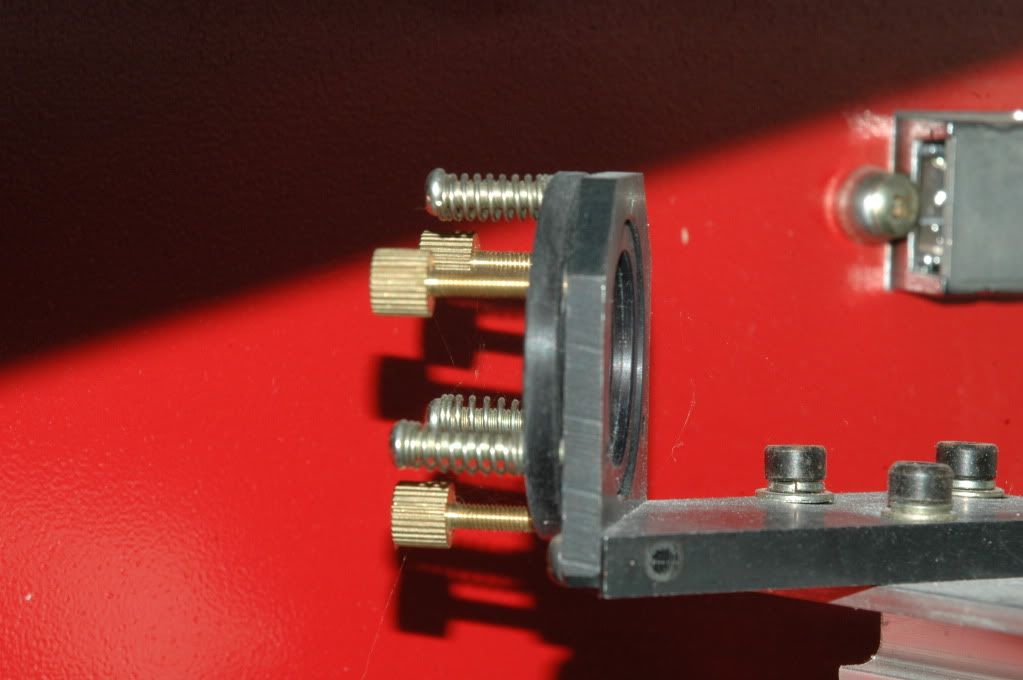
Turn the machine off and before moving it take a look where it lies in relation to the hole, you are looking for a circular shape perhaps 5 - 6 mm across and in an ideal world it would lie directly over the center of the hole. If not replace it and adjust the second mirror via the brass screws behind the mirror assembly, make small adjustments turning just one screw a little and firing the laser again, note which way the beam has moved, adjust and test again, remember small movements perhaps only a 5 degree turn of the brass screw in one operation
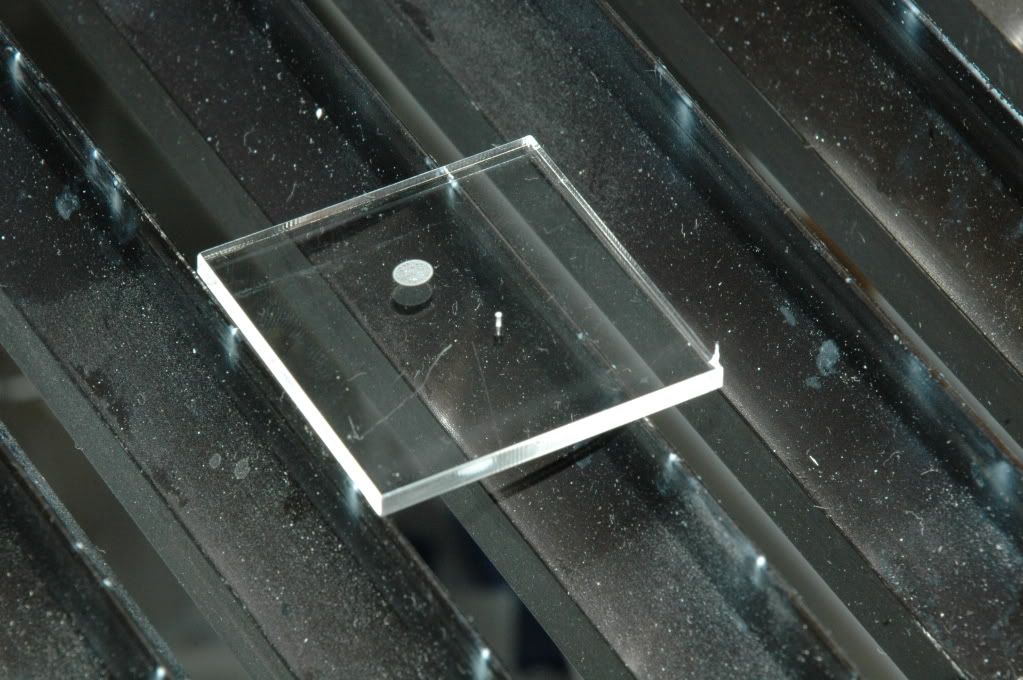
Once you are happy it is in in as central a position as you can make it, drop the test piece onto the table under the lens, focus in the usual way and fire manually enough to produce a hole (1 sec or less on my 60 watt tube with 3 mm material). It should leave a hole perfectly circular and uniform on both sides if you can measure it's diameter it would be 0.1 mm wide. You can see that here:
Don't forget to check the usual suspects for undesired results, look at this situation where a tiny off cut from a 1 mm hole core had found it's way under the table at one end inclining it by 2 mm across it's long side. Not always obvious but will generate a loss of focus from one end to the other. Keep a brush handy is the morale.
It's about time this table was cleaned, we had to cut smelly styrene and it leaves a sticky oily residue which will stick to the face of nice clean acrylic. Charlotte gave me a great tip to use oven cleaner like Mr Muscle (UK) it's basically a strong grease cutting detergent, but alloy wheel cleaner works just as well, remember rinse thoroughly .
Best regards.
Bernie_of_CPE (Custom Product Engineering)
Bernie_of_CPE (Custom Product Engineering)
-
phil2simmons
- Posts: 33
- Joined: Wed Jul 21, 2010 9:23 pm
- Location: Kent
- Contact:
Re: not cutting very deep
Hi Kris and Dave
I dont know if you have sorted out your problems yet but I note in one of your posts that you have been trying to cut HIPS. We also cut this material and always get the shape of cut you are describing ie the raised profile on the top side of the material. I have always put it down to the properties of the material having a low melting point (which is why it is good for vacuum forming) and becoming liquid as the laser cuts it. We cut 2.5mm HIPS at lower power (on a 60w laser than you are using and so I would suggest alignment/setup problems.
Phil
Re: not cutting very deep
I have the same issue with some thin HIPS I bought. I had plans for it, but the melted raised edges made this impossible for the application. Its cuttable, but gives useless results. Still looking for thin 1-1.5mm plastic thats laserable, and rigid!
http://www.tmbelectronics.com - Electronics, tools, hobby tools, power tools, and much more!
An ex LS3020 user now playing with an LS6840PRO (60W) and an LS1290PRO (80W)
An ex LS3020 user now playing with an LS6840PRO (60W) and an LS1290PRO (80W)
Re: not cutting very deep
I engraved thin lines rather than cut not long ago and that seemed to work ok - just takes a bit longer 
Dave
Dave
Using two LS3060's and an ex 3020 user
Please note I am not employed by HPC, any advice or recomendations I give are based on my own experience and are not necessarily the same as HPC's. First point of contact on any hardware issues should be with HPC
Please note I am not employed by HPC, any advice or recomendations I give are based on my own experience and are not necessarily the same as HPC's. First point of contact on any hardware issues should be with HPC
Who is online
Users browsing this forum: Ahrefs [Bot], Google [Bot] and 1 guest